Sunday 19 January 2014

Braking System:
The rear brakes were generally ok, will just need cleaning up and painting. The rears will remain standard, but the fronts will need upgrading.


The rear drums were put in the tub and then wire brushed and painted, they came up like new. 

All the books say you should upgrade the front brakes when fitting a V8, easier said than done. The suggested options are, Princess calipers, SD1 calipers, or Triumph 2000 calipers (to make a hybrid with your MGB outers). However, I cant find any of these calipers anywhere, so  I may have to rethink it. 

Update - Jan 2014. Managed to track down some Triumph 2000 mk11 Lockheed calipers, so this will the way forward. 

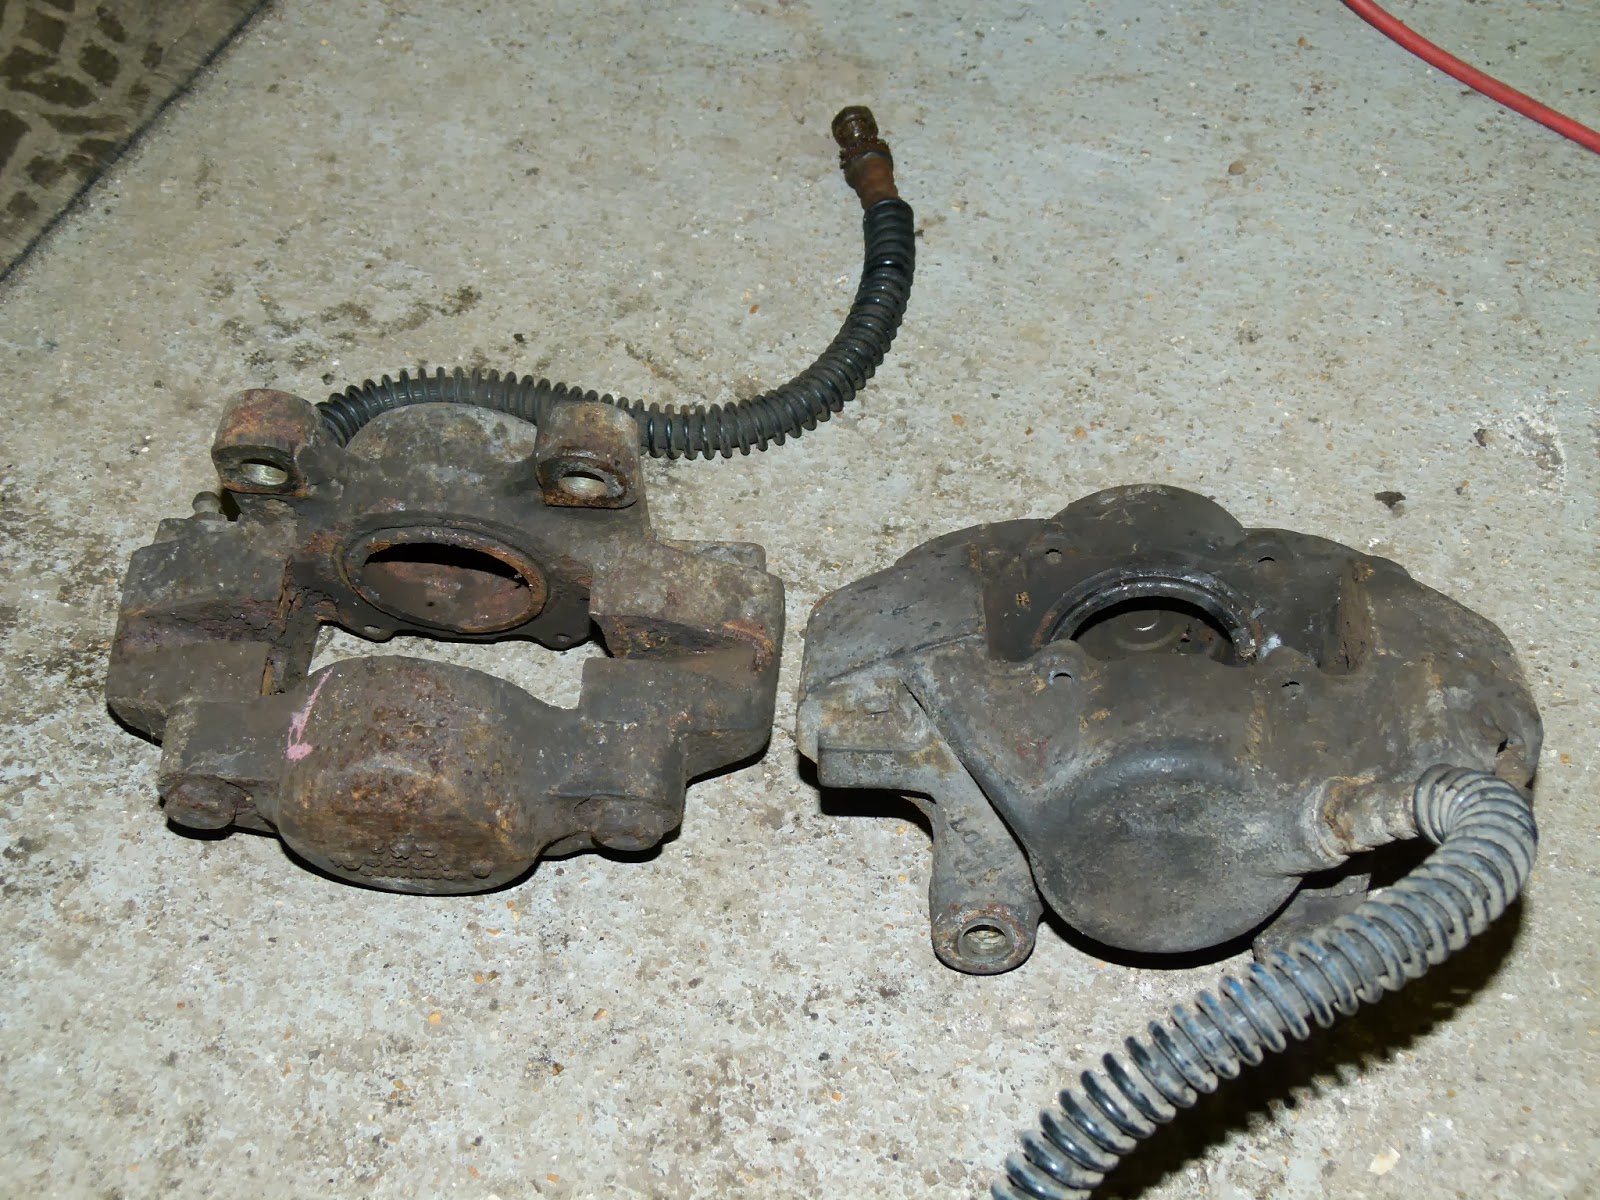
The MGB caliper is shown on the right and the Triumph 2000 caliper of the left, as you can see, the space for the disc is wider, to enable the MGB V8 discs to be fitted. However the outer section is also wider and will foul the wheel, so I will split the calipers and use the MGB outer on the Triumph inner, this then makes a caliper identical to the factory MGB V8, I can then fit V8 discs and pads. 

The calipers are dismantled and examined. I dont think I can save the pistons as there is some corrosion on the chrome plating, so I will renew the pistons and seals.
 The pads are different, you can see the standard MGB pad on the left compared to the Triumph 2000 / MGB V8 pad on the right. They both interchange with each other, but the V8 pad has a slightly larger area, so heat dispersion etc will be better, so I will use this type in the hybrid caliper.

This is the end result, Hybrid MGB V8 calipers made from the Triumph inners and MGB outers, with new pistons & seals, and a coat of silver paint.

 The calipers were then fitted, and the system filler with DOT5 Silcine brake fluid (paint friendly)

 As the exhaust downpipes run quite close to the brake hoses, I made some heat shields.


Rear Axle and suspension:

The weather in December has been horrendous,  severe winds, and heavy rain, just about non stop. The marquee blew down, and the MG now has just a cover over it, so work on the body is on hold until the weather improves and I can come up with a new cover/garage of some sort.

Therefor all work in December will be on the things I can do in the garage, like suspension etc.


The rear axle and suspension was removed completely and gradually stripped down. Some of the bolts had to be cut off because they were so rusted.


The diff cover plate had rusted through so will have to renewed.


Severe corrosion on the axle where the spring u bolts and bump stop bracket fits. I measured the depth of the pit to be around 4mm deep, the axle casing must be quite thick.

I searched for a metal repair compound and found several available, but I recalled something called Belzona from by Rover days, where we used to use it to repair cracked gearboxes. If you can get hold of some, its about the best stuff you can buy.


You mix it to the correct quantities and then apply it. 

I used a scraper to smooth it over, once it has gone off completely it is very hard and can be sanded or filed smooth. 


MGB's suffer from worn diff gear thrust washers, which shows itself as a clonk when taking up the power, fortunately it is easily fixed. 
To replace the MGB tube axle trust washers, firstly knock out the roll pin holding the diff gear shaft, and then tap out the shaft itself, making sure you rotate the diff before the shaft is out too far, otherwise you cannot rotate the diff to pull the shaft out.


 The smaller copper looking thrust washers are worn, and the larger washers are worn, and in fact the right hand side has worn away completely. these will be replaced with new ones.


The axle is now complete, new thrust washers, new oil seals, new diff cover and fully painted.


The rear springs were very rusty, cant really afford to replace them, so I stripped them down and overhauled them. You can prise part the clamps and undo the central bolt and then separate the springs. Each leaf was put in the home made electrolysis tub, then wire brushed, then treated with Jenolite rust converter, then painted with Bonda zink primer, and finally painted black. 

The springs were then reassembled and plenty of copper grease packed between the leaves. New bushes front and rear. 
Having now finishing paintwork (apart from flatting and polishing), I will now start refitting the mechanic (the best bit by far). In goes the fuel tank and back axle and rear suspension.

Front Steering & Suspension:
The front cross member was removed earlier as part of the strip down, and gradually I took it apart to de-rust and paint it.


Front suspension components, derusted and painted. 

The lower inner arm bushes were replaced with the V8 type single bush, a home made puller made the job easier. 

The front suspension will be lowered by using shorted springs, these are 1.5 inches lower, and should bring the front down to chrome bumper height. 

Original steering rack, cleaned and painted. 
Floor Pans:

The floor pans both have rusty areas, but are repairable.


  Same on the o/s, the rust was cut out and a repair section made, and welded in place.


Once the Castle Rails were removed, it then seemed easier to fit new floor pan edge repair sections, this made it easier to remove the castle rails and also dealt with the rust on the floor pan edges.