Start Here:
MGB GT 1979 Restoration
by Tim Stocker
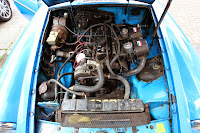
Welcome to our Blog, which will follow the highs and lows of the full restoration of a 1979 MGB GT.
The project not only involves restoring the MGB to tip top condition, but in the process we will be carrying out a V8 conversion and Chrome Bumper conversion, an epic task.
 |
June 2013:
This is the car we purchased, on the face of it, it looks ok, but under the various shades of Pageant Blue paintwork, is a lot of rust and filler. All four wings are rusty, the o/s door is quite bad and the heater box has all but vanished in a rusty pile, its going to get worse when we strip it.
The MG gets its first wash and engine degrease, most of water ended up inside the car due to the holes in the bulkhead.
August 2013:
Work begins. The engine and gearbox are the first things to come out.
The engine bay is stripped, the extent of the rust can now be seen, I cut away the front of the heater box to expose the rust. This is the first job on the list.
Heater Box repair:
All rust areas were cut away, the drain tube must have been blocked and the rain water just collected in the heater box, the drain tube and plate were just a pile of rust at the bottom.
You cannot buy repair panels for this area, so everything has to be made from scratch, I made the plate from sheet metal and the drain tube from plumbing pipe.
This is the repair welded into place.
A new front panel made and welded, seam sealed and primer applied.


Great detailed restoration work. Well done.
ReplyDeleteI have a BGT so I can relate to all the challenges you have had to face.
Question please what did you use to cut out the old rusted shelf (the one with the drain pipe). I find that the area is too small to use a mini grinder and a Dremel although small enough just does not have the strength to cut through the metal. Did you use a torch cutter?
Wishing you continued success with your project.
Thanks for your comments. I think from memory, I used a combination of angle grinder with a cutting disc and an electric hacksaw, and the final bits removed with a hammer and sharp chisel.
ReplyDelete